Do you have a Windows 11 computer or device and don’t know how to access the UEFI or BIOS? Are there any issues with your PC that you think can be repaired from there? Whether you need to enter UEFI/BIOS to troubleshoot your computer or adjust settings to improve its performance, in this tutorial, we show you how to access UEFI/BIOS on a Windows 11 PC in seven different ways:
CONTENTS
- 1. How to enter the UEFI/BIOS in Windows 11 from the Settings app
- 2. How to access the UEFI/BIOS from Windows 11 using Shift + Restart
- 3. How to get to the UEFI/BIOS from Windows 11’s Run window
- 4. How to enter UEFI/BIOS from Windows 11 using a shortcut
- 5. How to access the UEFI/BIOS from Windows 11 using Command Prompt, PowerShell, or Terminal
- 6. How to enter UEFI/BIOS from Windows 11 on a Surface Pro (eligible models)
- 7. How to enter UEFI/BIOS by pressing a key while on the POST screen
- Did you encounter problems accessing the UEFI/BIOS on your Windows 11 PC?
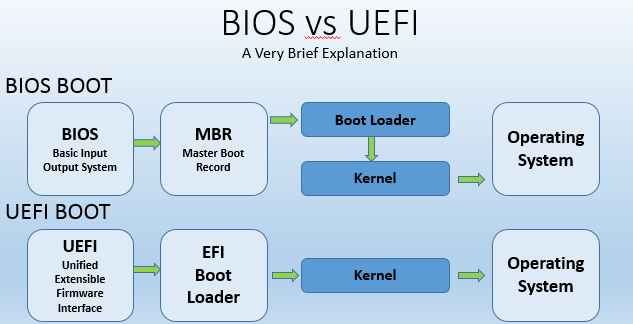
NOTE: If you want to know more about what UEFI/BIOS is and what it’s used for, first read What is BIOS? What does BIOS mean?
1. How to enter the UEFI/BIOS in Windows 11 from the Settings app
One of the most straightforward ways to access the UEFI/BIOS in Windows 11 is available in the Settings app. First, open the Settings (Win + I) and, in the System tab, click or tap on Recovery.

Open Recovery from the System page of the Windows 11 Settings
On the Recovery page, scroll until you get to the Recovery options section. There, you should find the Advanced startup option. On its right side, press the Restart now button.
Press Restart now next to Advanced startup
Windows 11 now warns you that it’s going to restart your device. Make sure you’ve saved your work in any of your open files, and then press Restart once more.

Save your work and restart your Windows 11 PC
After Windows 11 restarts, you see the “Choose an option” screen used by the operating system to give you access to the advanced startup options and other recovery tools. On it, click or tap on Troubleshoot (Reset your PC or see advanced options).

Select Troubleshoot
On the Troubleshoot screen, click or tap on the Advanced options.

Go to Advanced options
In the list of Advanced options, click or tap on “UEFI Firmware Settings.”

Click or tap UEFI Firmware Settings.
Windows 11 now informs you that you must “Restart to change UEFI firmware settings,” so press Restart to continue.

Restart to get into Windows 11’s UEFI BIOS
After your PC reboots, you are taken directly to its UEFI/BIOS.
2. How to access the UEFI/BIOS from Windows 11 using Shift + Restart
A fast and easy way to access the UEFI/BIOS from Windows 11 without even having to sign in is to use the Shift + Restart keyboard and mouse shortcut. On the sign-in or lock screen, while keeping the Shift key pressed, click or tap on the Power button from the bottom-right corner of the screen, and select Restart in the menu.

Similarly, you can press Shift on your keyboard and use the Restart option from the Start Menu Power options.

How to access Windows 11’s UEFI/BIOS from the Start Menu
After Windows 11 restarts, you reach the Advanced startup (Choose an option) screen. Like in the previous method in this guide, navigate to Troubleshoot > Advanced options > UEFI Firmware Settings and press Restart. Once you do that, Windows 11 restarts and enters UEFI/BIOS.
3. How to get to the UEFI/BIOS from Windows 11’s Run window
One other way to enter UEFI/BIOS on a Windows 11 PC is available via the Run window. Open Run (Windows + R), type shutdown /r /o /f /t 00, and click/tap on OK or press Enter on your keyboard.

Get into UEFI/BIOS from Windows 11’s Run box.
To access the UEFI/BIOS, you could also run the slightly shorter command shutdown.exe /r /o, but it’s not as fast as the previous command.

Restart into UEFI (BIOS) with a shorter command but slightly more time-consuming
Why is it not that fast? Because with this command, Windows 11 first notifies you that your computer has to shut down (restart). So, you have to wait for a couple of moments before it gets you to the UEFI/BIOS.

Windows 11 shut down notification.
After restarting, Windows 11 loads the same “Choose an option” screen. Use it to navigate to Troubleshoot > Advanced options > UEFI Firmware Settings and press Restart, just like we showed you in the first section of this tutorial. Then, Windows 11 restarts, and your PC enters its UEFI/BIOS environment.
4. How to enter UEFI/BIOS from Windows 11 using a shortcut
Perhaps the fastest way to access the UEFI/BIOS on a Windows 11 PC is to create and use a shortcut. We’ve already described everything you have to do in this tutorial: Shortcuts for the UEFI BIOS & Windows 10’s Recovery Environment. However, if you don’t have the time to read it, the short version is that you can create a regular shortcut anywhere on your Windows 11 PC and point its target to the shutdown /r /o /f /t 00 command we’ve also shown you in the previous section of this guide.

Shortcut for UEFI (BIOS) in Windows 11
Once you have the shortcut, double-click or double-tap on it, and it takes you to the “Choose an option” screen. On it, go to Troubleshoot > Advanced options > UEFI Firmware Settings and press Restart. Then, Windows 11 restarts again, and your PC enters its UEFI/BIOS environment.
5. How to access the UEFI/BIOS from Windows 11 using Command Prompt, PowerShell, or Terminal
If you prefer command-line environments, you can run the same commands from the previous section of this tutorial in Windows 11’s Command Prompt, or PowerShell. Open the command-line app you want, type shutdown /r /o /f /t 00, and press Enter on your keyboard. Then, your Windows 11 PC restarts, and you’re taken to the Advanced startup (Choose an option) screen.