Windows 10 is used on over 1 billion computers and devices, and many users want to install it independently. One way is to use a USB memory stick with the Windows 10 setup, a disc (like a DVD or CD), or an ISO file with the installation. The installation process is the same no matter the source; booting from a different source involves different selections. This guide shows you how to make a clean install of Windows 10 for free, using the following types of installation media: DVD, USB memory stick, and ISO file. There are many steps involved, so let’s get started:
CONTENTS
- Windows 10 minimum requirements
- What you should know and have prepared before installing Windows 10
- How to install Windows 10 from a DVD, USB memory stick, or ISO file
- How to customize your Windows 10 installation (setup steps)
- How to configure Windows 10 with a Microsoft account
- How to configure Windows 10 to use a local account
- Did you encounter problems doing a clean Windows 10 install?
NOTE: This guide is based on Windows 10 May 2021 Update, the most recent version of Windows 10 when this tutorial was created.
Windows 10 minimum requirements
Before installing Windows 10, read the Windows 10 Specifications on Microsoft’s website and review its system requirements. Windows 10 demands at least the following:
- Processor or System on a Chip (SoC): 1 GHz or faster, compatible with Windows 10
- RAM: minimum 1 gigabyte (GB) for the 32-bit version or 2 GB for the 64-bit version
- Free hard drive space: 32 GB or more for both the 32-bit and 64-bit versions. For the best experience, it is better to use 60 GB or more.
- Graphics card: Microsoft DirectX 9 compatible graphics card
- A display with a minimum resolution of 800 x 600 pixels
What you should know and have prepared before installing Windows 10
Before you start, you should have the Windows 10 product key, even though you can install it without one. However, you cannot fully use Windows 10 until you activate it and provide the product key. We recommend using a working internet connection and a Microsoft account.

An ISO file with the Windows 10 Setup
If you want to run Windows 10 on a virtual machine, the best virtualization applications that can run Windows 10 are VirtualBox, VMware Workstation (Player and Pro), and Hyper-V. VMware Workstation Player, Hyper-V, and VirtualBox are the free products on this list. If you want to install Windows 10 on a virtual machine, you need to mount the Windows 10 ISO setup file before starting the virtual machine.
During our tests, we discovered that, in some cases, the Windows 10 installation process might not offer you the option to create a local (non-Microsoft) offline account. If you are uncomfortable sharing your data with Microsoft, avoid connecting your computer to the internet before the installation is complete. This ensures you can finish the Windows 10 install process using a local account without being forced to create a Microsoft account to finish the process.
Finally, regardless of whether you want to know “How to install Windows 10 from DVD or CD?”, “How to install Windows 10 from ISO file?” or “How to install Windows 10 from USB?” the steps you need to take are identical, so let’s see how to make a clean Windows 10 install:
How to install Windows 10 from a DVD, USB memory stick, or ISO file
Boot your computer or virtual machine using the installation disc, USB flash drive, or an ISO file with the Windows 10 installation. In a few seconds, you see a quick message on the screen stating that you must press any key to continue. Do what the message says, and the Windows 10 logo is shown while the installation wizard is loaded.
First, the Windows 10 Setup asks what language, time and currency format, and keyboard input settings you want to use. Make the selections you prefer and press Next.

Windows 10 Setup – Choose the language, time, currency, and keyboard
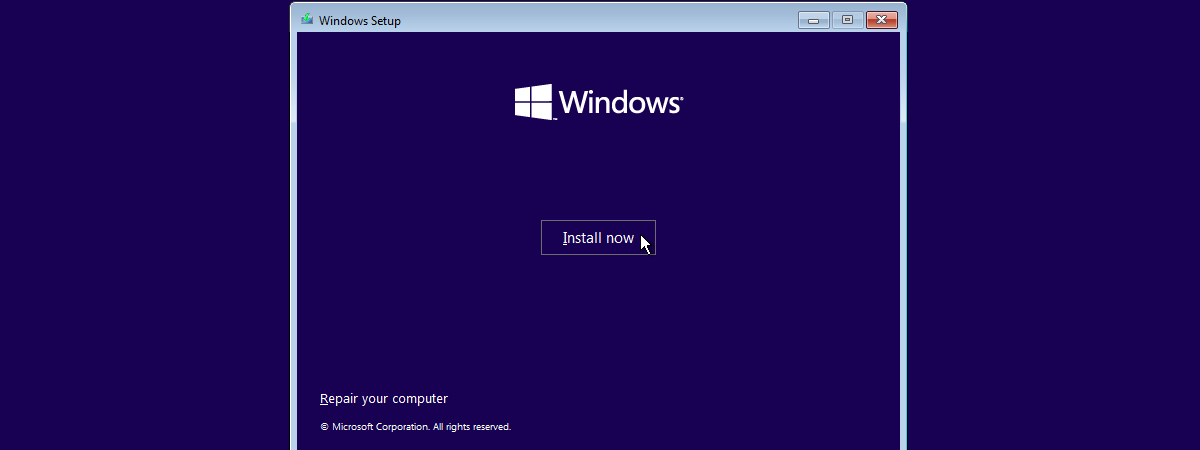
Click or tap Install now to start the Windows 10 installation.

Press Install now
The setup takes a couple of seconds to start and asks you to enter the product key for Windows 10. Type it and press Next. If you reinstall Windows 10, click that you do not have a product key, and your copy is automatically activated later. You can also clean and install Windows 10 without providing the key if you click or tap on “I don’t have a product key.”

Enter the Windows 10 activation key
Choose which Windows 10 edition you want to install: from Windows 10 Home to Windows 10 Education, all the way to Windows 10 Pro.

Choose the Windows 10 edition you want to install
You are shown the Windows 10 license terms. Read them if you wish and have the time. Then, check the box for “I accept the license terms” and press Next.

Accept the license terms.
You are asked for the type of installation you want to perform. To cleanly install Windows 10, click or tap “Custom: Install Windows only (advanced).” Otherwise, choose Upgrade.

Click or tap on Custom: Install Windows only (advanced)
You are asked to select where you want to install Windows. Choose the drive or partition you want to use for Windows 10 and press Next. If you need to configure your partitions in a specific way, do not hesitate to use the tools available for creating new partitions, deleting old ones, formatting, and so on before clicking Next.

Choose the partition where to install Windows 10
The setup takes minutes to copy all the required files and installs Windows 10. It also installs updates if it detects that it can connect to the internet. On a computer with an SSD drive, this step is surprisingly quick.

Windows 10 is installed.
Once the installation is done, the Windows 10 setup automatically reboots at least once to run the first-time configuration scripts. Wait for the process to finish. If you see the prompt below, you can skip the waiting by pressing Restart now.

Restart your computer now
While you wait, Windows 10 shows you the status of its “Getting ready” activities.

Windows 10 is getting ready to finalize its installation
During this step in the installation procedure, you might witness a couple of restarts. Don’t worry, they are normal.
How to customize your Windows 10 installation (setup steps)
After the reboots are finished, Windows 10 asks you to choose the region where you live. Select your country from the list, and then click or tap Yes.

Choose your country from the list.
You are asked to confirm the keyboard layout that you want to use. Choose the keyboard you prefer from the list, and press Yes.

Choose the keyboard layout you want to use
If you need to use a secondary keyboard layout, you can add a second one during the next step. Otherwise, choose Skip.

Choose whether to add a second keyboard layout.
If you have a working internet connection, Windows 10 checks if there are any updates available. If that is the case, it downloads and installs them. You don’t need to do anything during this step. Just wait.

The setup checks for Windows 10 updates
You are asked to select how you want to set up Windows 10. Suppose your computer belongs to an organization (for example, the company you work at); select “Set up for an organization” and use your business account to sign in and access your resources. Otherwise, choose “Set up for personal use” and press Next. Since our guide is for home users, this is what we also selected.

Choose the type of account you want to use
Read the second page of this tutorial to see how to configure the user account as part of the Windows 10 install process. The second page is beneficial if you want to install Windows 10 and use a local account instead of a Microsoft account.
How to configure Windows 10 with a Microsoft account
You are asked to sign in with your Microsoft account. If you want to do so, enter your credentials and click or tap Next. Otherwise, skip to the next section of this guide if you use a local account on your Windows 10 PC. If you have selected to set up the PC for an organization during the previous step, you are asked how you want to connect Windows 10 to your organization.

Enter the email for your Microsoft account
If you have enabled two-step verification for your Microsoft account, you may see a number you need to confirm in the specialized mobile app you use for such purposes. Otherwise, you are asked to type the password of your Microsoft account. Do so, and press Next.

Enter the password for your Microsoft account
NOTE: You may also be requested to confirm your identity with a sign-in request on your smartphone using the Microsoft Authenticator app.
In the next step, the Windows 10 setup asks whether you want to create a PIN for faster access to your system. Press “Create a PIN.”

Choose to Create a PIN for fast access to Windows 10
Now enter a PIN code for quick access and then confirm it. Press OK to continue.

Enter and confirm the PIN code
On the “Choose privacy settings for your device” screen, select whether you want to enable or disable features like Location, Diagnostic data, Find my device, Online speech recognition, Inking & typing, and Tailored experiences. We recommend that you carefully read what each option does and only turn on those you feel comfortable with. When you are finished changing settings, press Accept.

Customize your privacy settings
You are asked to customize your Windows 10 PC or device by choosing the kind of activities you do on it: Gaming, Schoolwork, Entertainment, Business, and so on. Windows 10 will provide personalized tips and recommendations for relevant features, products, and services depending on your preferred activities. When you are done selecting things, press Accept.

Select the types of activities you perform in Windows 10
You are recommended to link your phone and PC to take calls from your PC, send text messages, or use your mobile apps. To continue, press “Skip for now” or “Remind me later.”

Windows 10 recommends using your phone from your PC
If you want to use OneDrive to save your valuable files in the cloud, you can enable it by pressing Next. You can also opt out and not use this feature by clicking on “Only save files to this PC” in the bottom-left corner.

Do you want to use OneDrive?
If earlier you choose Gaming as an activity, Microsoft might recommend you to buy a month of Xbox Game Pass for PC. If you don’t want it or want to decide later, press “No thanks.”

Do you want to buy an Xbox Game Pass for PC?
If you want to get help from Cortana, Microsoft’s virtual assistant, you can Accept to enable her. However, you should know that Microsoft needs to collect information about you and your device for Cortana to work well. That includes your location history, contacts, voice input, speech and handwriting patterns, typing history, search history, calendar details, and others; if you don’t want Cortana, press Not now.

Do you want to enable Cortana?
Windows 10 takes a while to prepare your computer or device, apps, and settings. This process may take some time, so be patient.

Wait for Windows 10 to finish everything.
When it is done, you are logged in, and you can view the Windows 10 desktop. Congratulations, you have finished installing Windows 10 on your PC, all by yourself!
How to configure Windows 10 to use a local account
If you do not want to use a Microsoft account, you can install Windows 10 without it. When the Windows 10 installation asks about adding an account, click or tap the “Offline account” link.

Choose Offline account
Microsoft tries to convince you that an online account is better. If you still want the offline account, click or tap Limited experience.

Choose Limited experience
We noticed that, on some Windows 10 PCs, the “Offline account” option highlighted earlier is missing. It seems random because we used the same Windows 10 setup disc on multiple PCs with different results. If you don’t see this option, you can create a local account during the Windows 10 setup only if you disconnect your PC from the internet before starting the installation process. Then, you are taken directly to a screen where you can choose a name for your local user account. Insert your desired username and press Next.

Enter the name of your local account
Enter the password you want to use for your offline account, press Next, confirm it, and press Next.

Enter and confirm the password for your local account
For offline accounts, Windows 10 asks you to answer three security questions. Choose the questions you prefer, enter their answers, and press Next for each question.

Choose and answer the security questions.
Now you’re asked about choosing the privacy settings for your device. Select whether you want to enable or disable features like Location, Diagnostic data, Find my device, Tailored experiences, or Advertising ID. We recommend that you carefully read what all options do and turn on only those you feel comfortable with. Press Accept when you are done.

Choose privacy settings for your device.
Choose whether you want to use Cortana as your digital assistant. To enable her, press Accept. To disable her, press Not now.

Do you want to enable Cortana?
Windows 10 takes a while to prepare everything and be ready for use. Wait for a bit.

Wait a few moments before you can use Windows 10
When it finishes, you are logged in and can view the desktop.
Did you encounter problems doing a clean Windows 10 install?
As you can see, the setup process for Windows 10 is lengthy. Furthermore, there are quite a few things you can configure about the way it works, even before you finish installing it. We hope our guide was complete enough to guide you through all the steps. If you have any questions or problems, do not hesitate to ask below. Also, we want to know your first impressions of Windows 10. Do you like this operating system? Would you recommend it to others? Comment below, and let’s discuss.